Carrier Management
This guide covers everything you need to manage your carriers (delivery drivers): creating records, filling in details, editing, deleting, viewing details, statistics, and tracking performance.
Table of Contents
- Accessing the Carriers Module
- Creating a Carrier
- Carrier Form Fields
- Editing a Carrier
- Deleting a Carrier
- Viewing Carrier Details
- Carrier Statistics
- Importing and Exporting Carriers
- Bulk Actions
1. Accessing the Carriers Module
In the left sidebar, click on Livreurs to expand the section. You will see two sub-pages:
- Liste Livreurs — the main list of all your carriers
- Statistiques Livreur — aggregate performance stats per carrier
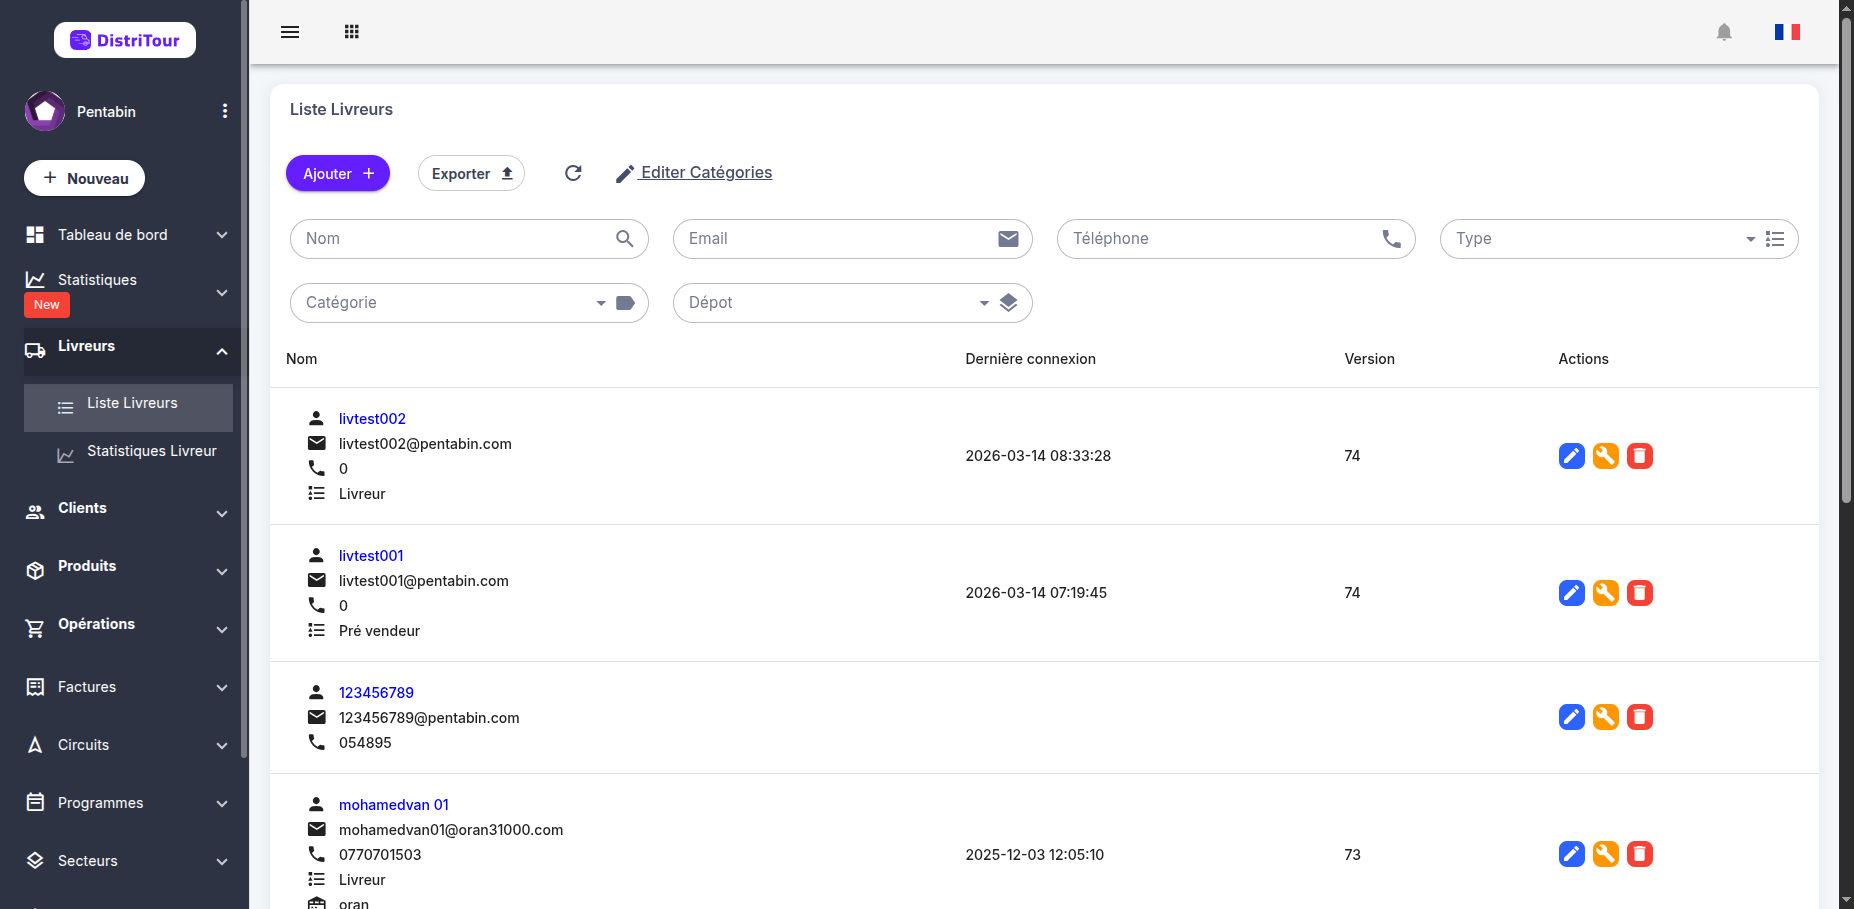
The main carriers table shows the following columns:
| Column | Description |
|---|---|
| Nom | Carrier name (clickable to view details) |
| Dernière connexion | Last login timestamp |
| Version | App version number |
| Actions | Edit ✏️, View 📖, Delete 🗑️ buttons |
Filters: Use the filter bar at the top to search by name, email, phone, type, category, or depot.
2. Creating a Carrier
- Click the + Ajouter button in the top-left of the Carriers list.
- Fill in all required fields in the form (see Carrier Form Fields).
- Click Enregistrer at the bottom to save.
3. Carrier Form Fields
The create (and edit) form is split into two main sections:
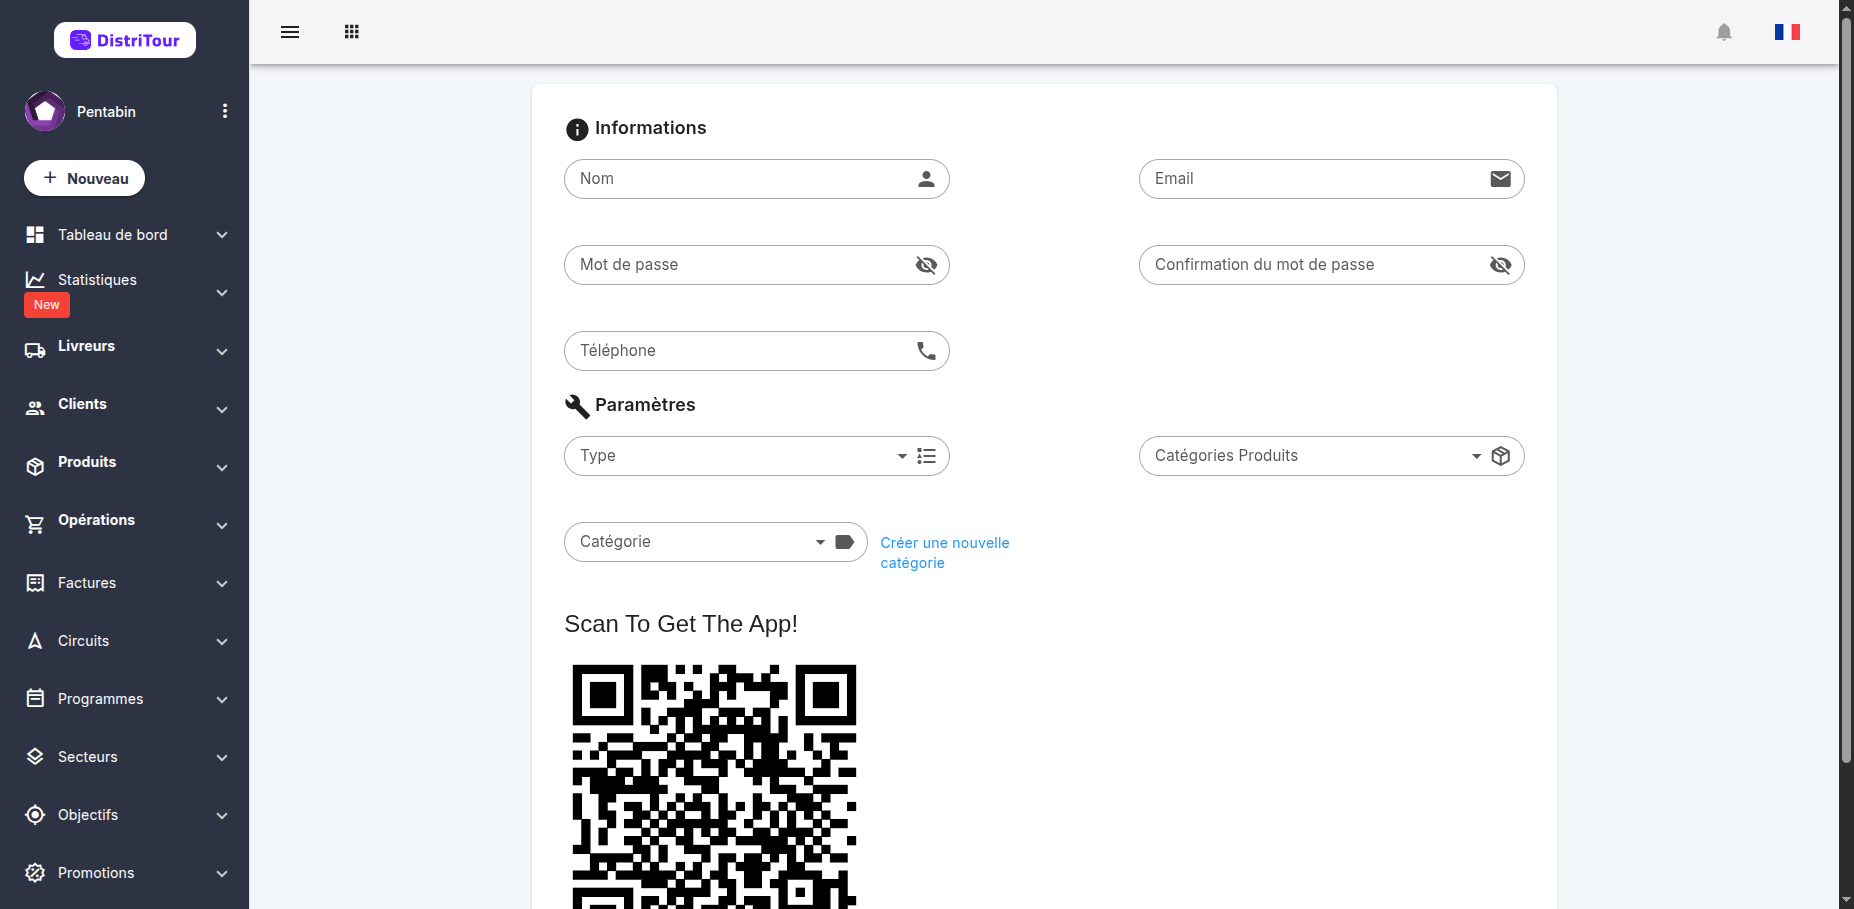
Section 1 — Information
| Field | Required | Description |
|---|---|---|
| Nom | Yes | Full name of the carrier |
| Yes | Email address (auto-generated from name) | |
| Mot de passe | Yes (create only) | Password for the carrier account |
| Confirmation du mot de passe | Yes (create only) | Confirm password |
| Téléphone | Yes | Phone number |
Section 2 — Parameters
| Field | Required | Description |
|---|---|---|
| Type | No | Carrier type (Livreur, Pré vendeur, Cash Van, etc.) |
| Catégories Produits | No | Product categories the carrier can access |
| Catégorie | No | Carrier category for organizational purposes |
QR Code for Mobile App
After filling in the carrier name, a QR code is displayed. The carrier can scan this QR code to download the mobile app and log in with their credentials.
Once all fields are filled, click Enregistrer at the bottom right to save the carrier.
4. Editing a Carrier
From the List
- Find the carrier in the Carriers list.
- Click the pencil icon ✏️ in the Actions column.
- Edit the required fields — the form is identical to the creation form, but pre-filled with existing data.
- Click Enregistrer to save your changes.
From the Details Page
- Open a carrier's detail page by clicking on their name in the list.
- Click the Modifier button next to their name.
- Update the fields and click Enregistrer.
5. Deleting a Carrier
⚠️ Warning: Deleting a carrier permanently removes them from the active list.
- In the Carriers list, find the carrier's row.
- Click the red trash icon 🗑️ in the Actions column.
- Confirm the deletion in the dialog that appears.
6. Viewing Carrier Details
Click a carrier's name (shown as a blue link) anywhere in the list to open their detail page.
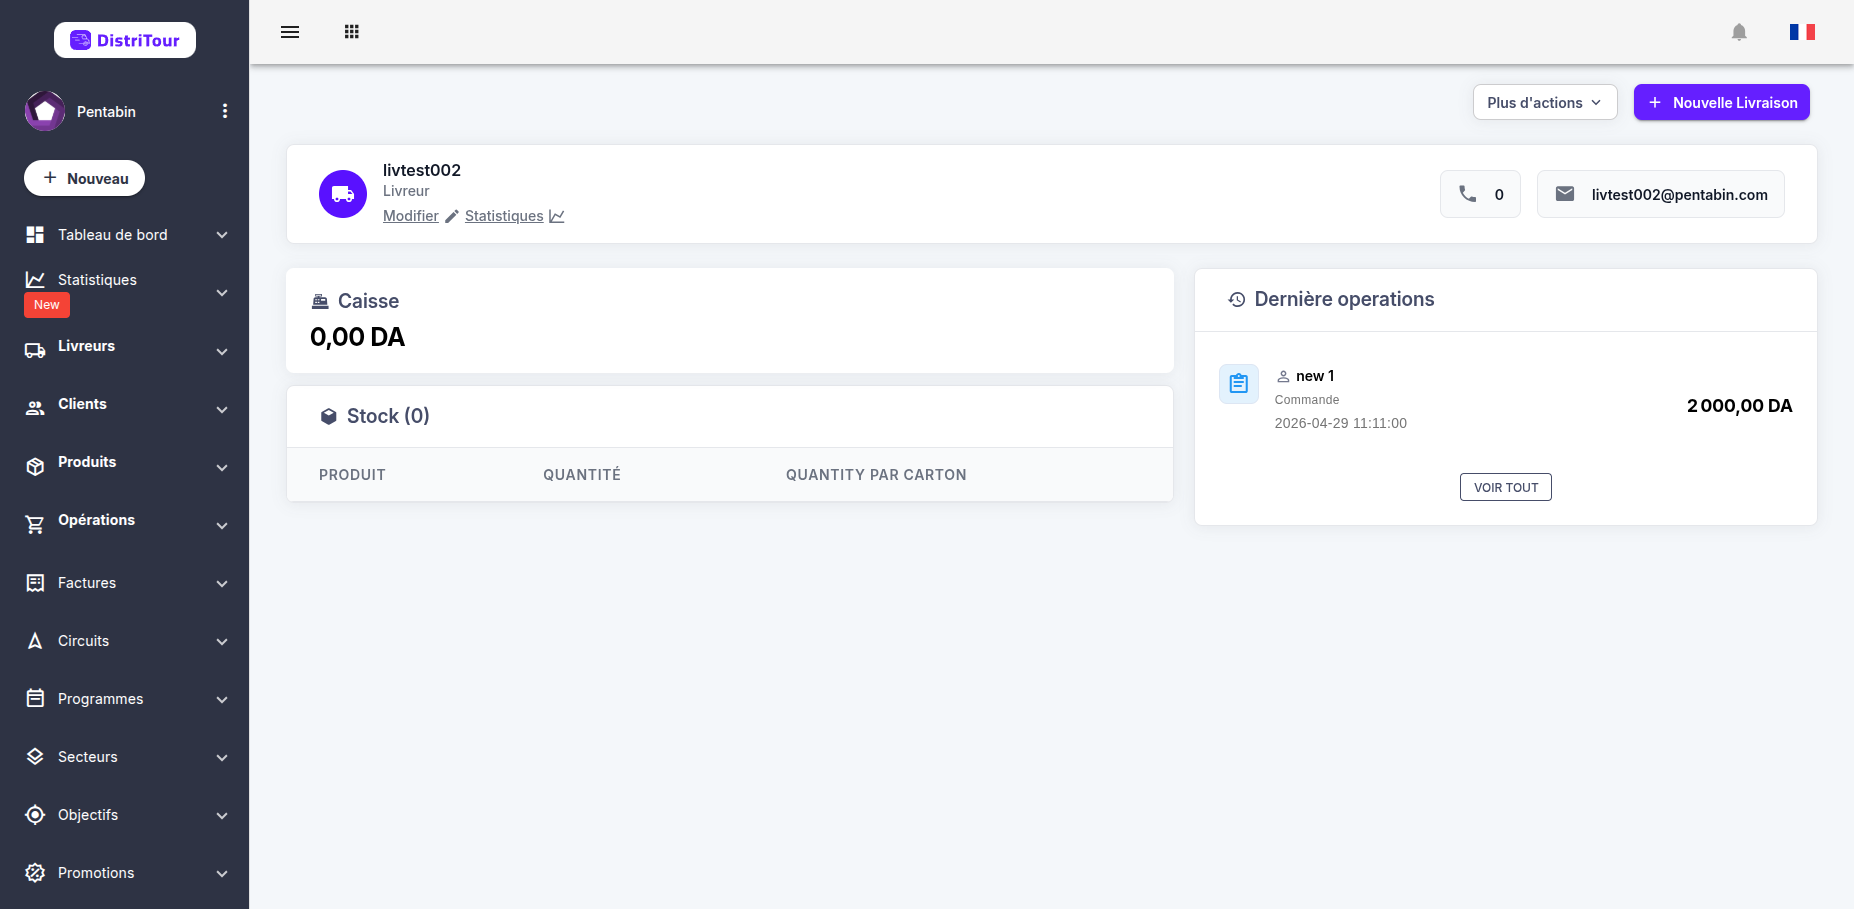
The detail page is divided into the following sections:
Carrier Information Card
Displays the carrier's name, email, phone, and type with quick action buttons:
- Modifier — opens the edit form
- Statistiques — opens carrier statistics
Cash Balance
Shows the carrier's current cash balance (caisse) for managing payments and transactions.
Stock Information
Displays the carrier's current stock levels with:
- Product name
- Quantity
- Quantity in boxes
- Stock value (buy and sell prices)
Transaction History
Shows recent transactions (Livraison, Versement, Retour, Commande) related to this carrier with:
- Client name
- Amount
- Transaction type
- Date
Goals
Displays the carrier's current goals and their progress.
Quick Actions
Buttons to quickly create:
- New delivery
- Order
- Payment
- Return
- Charge
- Discharge
- Initial stock
7. Carrier Statistics
Navigate to Livreurs → Statistiques Livreur from the sidebar.
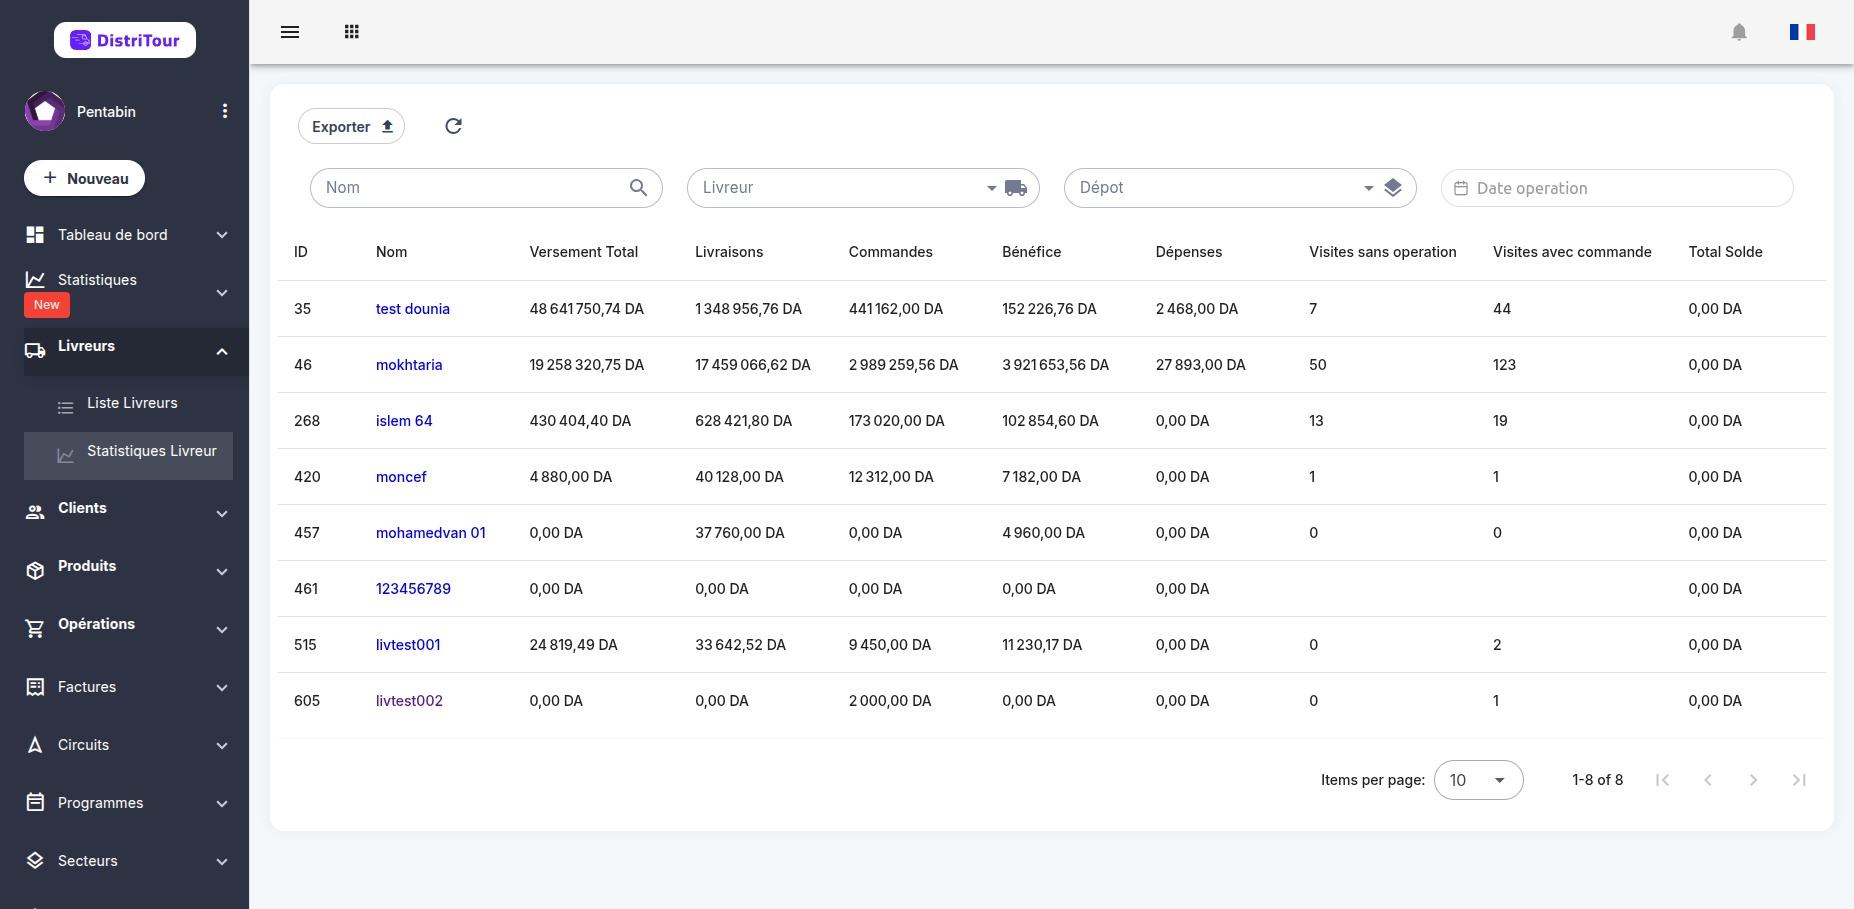
Statistics Table
Each row represents one carrier and shows aggregated data across the selected date range:
| Column | Description |
|---|---|
| ID | Internal carrier identifier |
| Nom | Carrier name (clickable to open their detail page) |
| Versement Total | Total amount of payments collected |
| Livraisons | Total delivery amount |
| Commandes | Total orders amount |
| Bénéfice | Total profit generated by this carrier |
| Dépenses | Total expenses recorded |
| Visites sans operation | Number of visits with no associated transaction |
| Visites avec commande | Number of visits that generated an order |
| Total Solde | Carrier's total balance |
Available Filters
- Nom — Search by carrier name
- Livreur — Select a specific carrier
- Dépôt — Filter by depot
- Date operation — Date range picker to filter all statistics for a specific period
Tip: Use the date picker to compare performance across different periods (e.g., last month vs this month).
Export
Click the Exporter button to download the statistics table as a CSV/Excel file for reporting.
8. Importing and Exporting Carriers
Export
- From the Carriers list, click the Exporter button in the toolbar.
- The system generates and downloads a file (CSV/Excel) containing all currently visible carrier data, including any filtered results.
Import
- Click the Importer button in the Carriers list toolbar.
- Select and upload your formatted file.
- The system processes the file and adds or updates carriers accordingly.
Contact your administrator for the correct import file template and column format.
9. Bulk Actions
The carriers list supports bulk actions — select multiple carriers using the checkboxes, then click the Actions button that appears to perform an operation on all selected carriers at once.
Available Bulk Actions
| Action | Description |
|---|---|
| Delete Selected | Permanently delete all selected carriers (subject to permissions) |
How to Use Bulk Actions
- Select carriers: Check the box next to each carrier you want to include. You can also use the checkbox in the table header to select/deselect all.
- Open the Actions menu: An Actions button appears above the table once at least one carrier is selected.
- Choose an action: Click the button and select the desired action from the dropdown menu.
- Confirm: Depending on the action, a dialog will appear for you to configure and confirm the operation.